Contents
- Step 1. Create a project using Composer.
- Step 2. Change to the project directory
- Step 3. Add the ece-tools and Cloud Docker for Community packages.
- Step 4. Create the default configuration source file .magento.docker.yml to build the Docker containers for the local environment.
- Step 5. To update and install using the Magento installation script
- Step 6. Update the project dependencies.
- Step 7. In your local environment, generate the Docker Compose configuration file.
- Step 8. Add auth.json file
- Step 9. Build files to containers and run in the background.
- Step 10. Deploy Magento in the Docker container and run post-deploy hooks.
- Step 11. Configure and connect Varnish.
- Last step. At this point, you’re almost done.
Installing Magento 2 on Docker makes it easy and convenient for you to manage the environment and versions. This article will guide you step by step to install Magento 2 on docker
Step 1. Create a project using Composer.
Create a directory to install Magento 2 into and run the code below
composer create-project --repository-url=https://repo.magento.com/ magento/project-community-edition <install-directory-name>The above command installs the latest Magento release. To install a specific version, specify the version number, for example
magento/project-community-edition=2.4.2Step 2. Change to the project directory
Step 3. Add the ece-tools and Cloud Docker for Community packages.
composer require --no-update --dev magento/ece-tools magento/magento-cloud-docker
Step 4. Create the default configuration source file .magento.docker.yml to build the Docker containers for the local environment.
The below configuration is for Magento version 2.4.2
name: magento
system:
    mode: 'production'
services:
    php:
        version: '7.4'
        extensions:
            enabled:
                - xsl
                - json
                - redis
    mysql:
        version: '10.4'
        image: 'mariadb'
    redis:
        version: '6.0'
        image: 'redis'
    elasticsearch:
        version: '7.9.0'
        image: 'magento/magento-cloud-docker-elasticsearch'
hooks:
    build: |
        set -e
        php ./vendor/bin/ece-tools run scenario/build/generate.xml
        php ./vendor/bin/ece-tools run scenario/build/transfer.xml
    deploy: 'php ./vendor/bin/ece-tools run scenario/deploy.xml'
    post_deploy: 'php ./vendor/bin/ece-tools run scenario/post-deploy.xml'
mounts:
    var:
        path: 'var'
    app-etc:
        path: 'app/etc'
    pub-media:
        path: 'pub/media'
    pub-static:
        path: 'pub/static'
You can config suitable services for different Magento versions using the information in this link https://devdocs.magento.com/guides/v2.4/install-gde/system-requirements.html
Step 5. To update and install using the Magento installation script
This script will install the template dependencies and add the default hostname to your /etc/hosts file.
curl -sL https://github.com/magento/magento-cloud-docker/releases/download/1.2.3/init-docker.sh | bash -s -- --php 7.4
Step 6. Update the project dependencies.
composer update
Step 7. In your local environment, generate the Docker Compose configuration file.
./vendor/bin/ece-docker build:compose --mode="developer"
After this script finish, you will see a file name docker-compose.yml. That file is the Docker Compose configuration file sometimes the image for docker is generated incorrectly. You have to edit the file and correct it according to the Magento version and image Tags version in magento docker hub.
Step 8. Add auth.json file
Sign in to the Magento Marketplace > get into My Profile > choose Access Keys and Create a New Access Key if needed
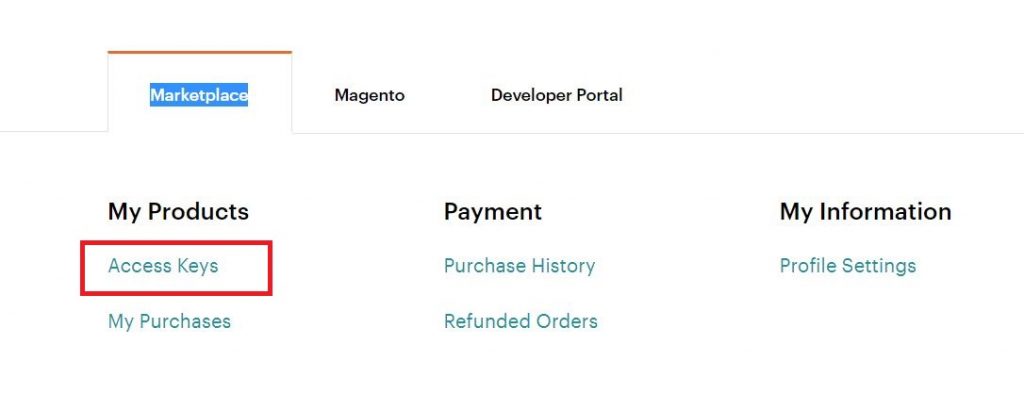
The last result is that you have a pair of <public-key> and <private-key>. Create file name auth.json contains below content in your project directory
{
    "http-basic": {
        "repo.magento.com": {
            "username": "<public-key>",
            "password": "<private-key>"
        }
    }
}
Step 9. Build files to containers and run in the background.
docker-compose up -d
Step 10. Deploy Magento in the Docker container and run post-deploy hooks.
docker-compose run --rm deploy cloud-deploy
docker-compose run --rm deploy magento-command deploy:mode:set developer
docker-compose run --rm deploy cloud-post-deploy
Step 11. Configure and connect Varnish.
docker-compose run --rm deploy magento-command config:set system/full_page_cache/caching_application 2 --lock-env
docker-compose run --rm deploy magento-command setup:config:set --http-cache-hosts=varnish
Last step. At this point, you’re almost done.
Now, clear the cache.
docker-compose run --rm deploy magento-command cache:clean
Access the local Magento Cloud template through http://magento2.docker or https://magento2.docker
Use the default credentials to log in to the Admin (https://magento2.docker/admin):
username = Admin
password = 123123q
Now that you are done installing Magento 2 on Docker. If you want to know how to install sample data and how to access the database, please read Install Magento 2 on Docker – Part 2