
Recently I have found one solution to add a calendar in system configuration options. Let’s discuss this in detail.
In order to add a calendar in system configuration options, we have to add one system field and require one Block file.
Use the below code to add the system field.
Step1# open your module system.xml from
app/code/NameSpace/ModuleName/etc/adminhtml
and following code in it
<?xml version="1.0"?>
<config xmlns:xsi="http://www.w3.org/2001/XMLSchema-instance" xsi:noNamespaceSchemaLocation="../../../Config/etc/system_file.xsd">
    <system>
        <section id="yoursectionid" translate="label" type="text" sortOrder="10" showInDefault="1" showInWebsite="1" showInStore="1">
            <label>Custom Label</label>
            <tab>tabname</tab>
            <resource>NameSpace_ModuleNmae::config_modulename</resource>
            <group id="general" translate="label" type="text" sortOrder="1" showInDefault="1" showInWebsite="1" showInStore="1">
                <label>General Settings</label>
                <!-- date picker field code start-->
                <field id="start_date" translate="label comment" sortOrder="4" type="text" showInDefault="1" showInStore="1" >
                    <label>Start Date</label>
                    <!-- here we pass class where we create date picker-->
                    <frontend_model>NameSpace\ModuleName\Block\DatePicker</frontend_model>
                </field>
                <!-- date picker field code end-->
            </group>
        </section>
    </system>
</config>
Step #2: Now we create DatePicker class in file DatePicker.php at
app/code/NameSpace/ModuleName/Block/ folder where we create date picker element
<?php
namespace NameSpace\ModuleName\Block;

use Magento\Framework\Registry;
use Magento\Backend\Block\Template\Context;

class DatePicker extends \Magento\Config\Block\System\Config\Form\Field
{
    /**
     * @var  Registry
     */
    protected $_coreRegistry;

    /**
     * @param Context  $context
     * @param Registry $coreRegistry
     * @param array    $data
     */
    public function __construct(
        Context $context,
        Registry $coreRegistry,
        array $data = []
    ) {
        $this->_coreRegistry = $coreRegistry;
        parent::__construct($context, $data);
    }

    protected function _getElementHtml(\Magento\Framework\Data\Form\Element\AbstractElement $element)
    {
        //get configuration element
        $html = $element->getElementHtml();
        //check datepicker set or not
        if (!$this->_coreRegistry->registry('datepicker_loaded')) {
            $this->_coreRegistry->registry('datepicker_loaded', 1);
        }
        //add icon on datepicker
        $html .= '<button type="button" style="display:none;" class="ui-datepicker-trigger '
            .'v-middle"><span>Select Date</span></button>';
        // add datepicker with element by jquery
        $html .= '<script type="text/javascript">
            require(["jquery", "jquery/ui"], function (jq) {
                jq(document).ready(function () {
                    jq("#' . $element->getHtmlId() . '").datepicker( { dateFormat: "dd/mm/yy" } );
                    jq(".ui-datepicker-trigger").removeAttr("style");
                    jq(".ui-datepicker-trigger").click(function(){
                        jq("#' . $element->getHtmlId() . '").focus();
                    });
                });
            });
            </script>';
        // return datepicker element
        return $html;
    }
}
Run command
php bin/magento setup:uppgrade
php bin/magento s:s:d -f
php bin/magento cache:flush
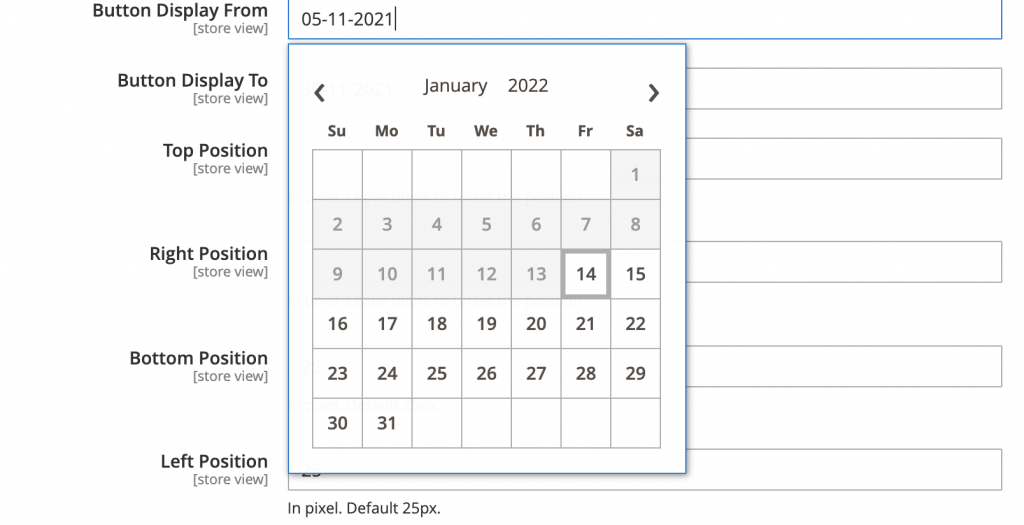
Step 3# Now in your admin section you get this date picker element as following
Hope this article will help you in some way, You can see useful articles in the next articles.
Anything you need support from Magento 2 feel free to contact us at Alothemes and
Phone: (+84)865633728
Email: support@alothemes.com