
Contents
Hi everyone, you want a versatile config, but you don’t know how to add them to Magento yet, today I will show you how to add WYSIWYG editor in Magento 2 stores configuration.
Step 1. Created system.xml config file in your custom module and add WYSIWYG editor.
/Magepow/WysiwygEditorConfig/etc/adminhtml/system.xml
<?xml version="1.0"?> <config xmlns:xsi="http://www.w3.org/2001/XMLSchema-instance" xsi:noNamespaceSchemaLocation="../../../Config/etc/system_file.xsd"> <system> <tab id="magepow" translate="label" < span class="hljs-attr">sortOrder="15"><label><![CDATA[Magepow]]></label> </tab> <section id="magepow_wysiwygeditorconfig" translate="label" type="text" sortOrder="1" showInDefault="1" showInWebsite="1" showInStore="1"> <label>Configuration& lt;/label> <tab>magepow_tab</ tab> <resource> Magepow_WysiwygEditorConfig::config</resource> <group id="magepow_group" translate="label" type="text" sortOrder="1" showInDefault="1" showInWebsite="1" < span class="hljs-attr">showInStore="1"> <label>Magepow Config Group</label> <field id="wysiwyg_editor" translate="label" type="editor" < span class="hljs-attr">sortOrder="1" showInDefault="1" showInWebsite=< span class="hljs-string">"1" showInStore= "1"> <label>Wysiwyg Editor</label> <frontend_model> Magepow\WysiwygEditorConfig\Block\Adminhtml\System\Config\Form\Field\WysiwygEditor</frontend_model> </field> </group> </section> </system> </config>
Step 2. Created WysiwygEditor.php Block file.
This file is responsible for defined fontend model in the system.xml file
/Magepow/WysiwygEditorConfig/Block/Adminhtml/System/Config/Form/Field/WysiwygEditor.php
<?php

namespace Magepow\WysiwygEditorConfig\Block\Adminhtml\System\Config\Form\Field;

use Magento\Backend\Block\Template\Context;
use Magento\Cms\Model\Wysiwyg\Config as WysiwygConfig;
use Magento\Config\Block\System\Config\Form\Field as FormField;
use Magento\Framework\Data\Form\Element\AbstractElement;

class WysiwygEditor extends FormField
{
      protected $wysiwygConfig;

      public function __construct(
          Context $context,
          WysiwygConfig $wysiwygConfig,
          array $data = []
      ) {
          $this->_wysiwygConfig = $wysiwygConfig;
          parent::__construct($context, $data);
    }
      protected function _getElementHtml(AbstractElement   $element)
      {
          $element->setWysiwyg(true);
          $element->setConfig($this->  _wysiwygConfig->getConfig($element));
          $this->_wysiwygConfig->getConfig(['add_variables'   => true,'add_widgets' => false,'add_images' =>   true,]);
          return parent::_getElementHtml($element);
      }
}
Step 3. Add update handle of layout in adminhtml_system_config_edit.xml file.
/Magepow/WysiwygEditorConfig/view/adminhtml/layout/adminhtml_system_config_edit.xml
<?xml version="1.0"?>
<page xmlns:xsi="http://www.w3.org/2001/XMLSchema-instance" xsi:noNamespaceSchemaLocation="urn:magento:framework:View/Layout/etc/page_configuration.xsd">
   <update handle="editor" />
</page>
Step 4. Run command:
php bin/magento s:up
php bin/magento s:s:d -f
php bin/magento c:f
This is result:
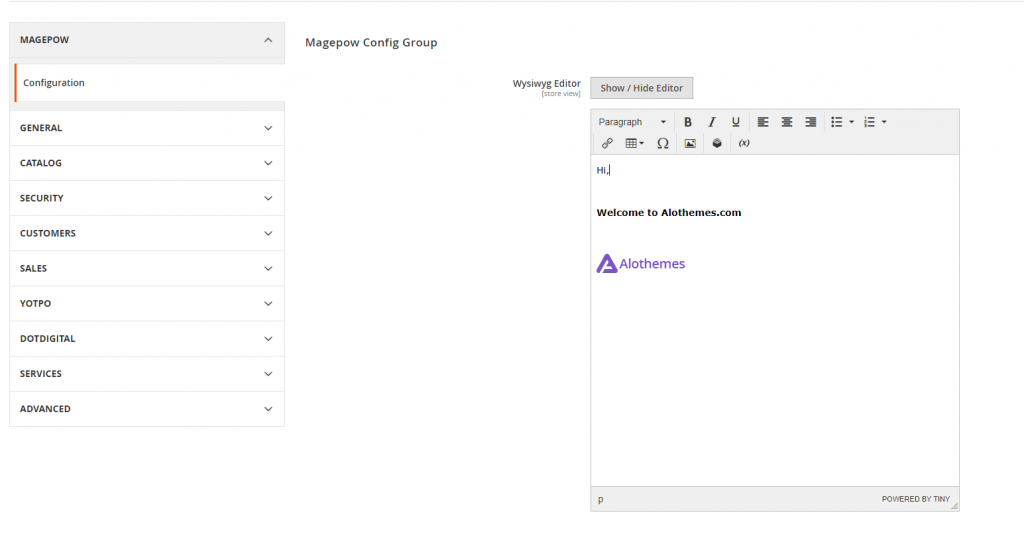
Magepow.com
Done, I hope this article will help you.